TL;DR
直接跳转到 脚本 小节按照教程配置即可。
使用方式:
proxy set # 设置代理
proxy unset # 还原代理设置
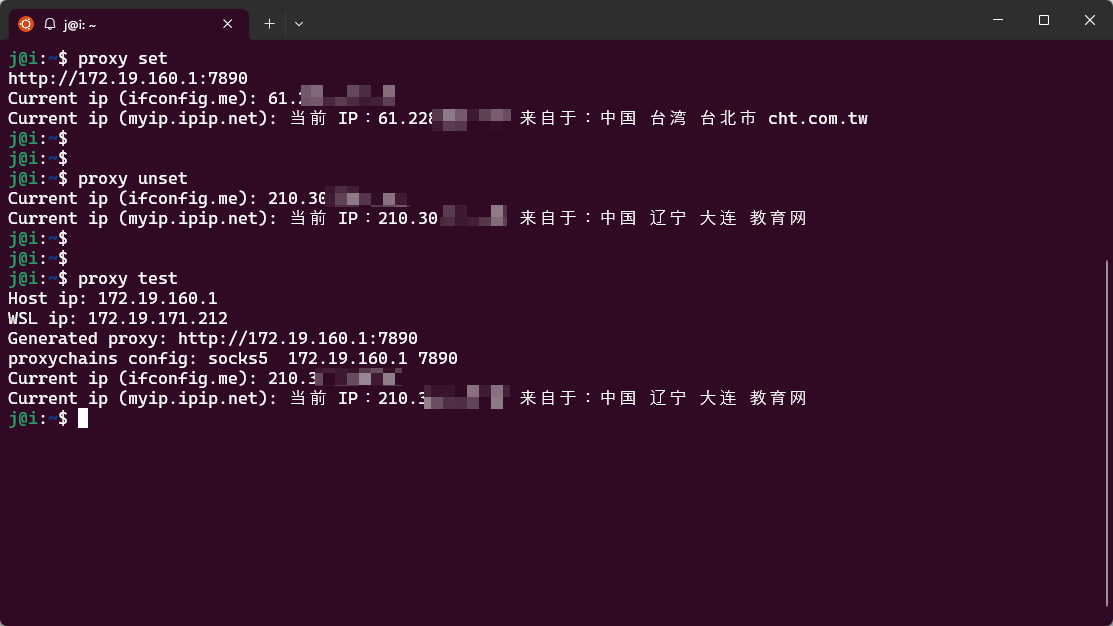
proxy test # 脚本和网络测试
对于不遵循环境变量的软件,可以用 proxychains。
背景
WSL2 是一种在 Windows 上运行 Linux 发行版的技术,它采用虚拟化的方式,在Windows上运行一个真正的Linux内核。通过 WSL2 ,用户可以方便地使用 Linux 命令行工具,并且支持与 Docker 等容器化平台集成,大大简化了开发流程。
受限于实现方式,WSL2 无法如 WSL1 那样直接使用宿主的代理服务,需要一点特殊的配置。最近在追南京大学的操作系统:设计与实现 (2023 春季学期) (jyywiki.cn),搭建实验环境时花了一点时间折腾代理的事情。于是就想着把配置方式记录下来,方便以后复用。
准备工作
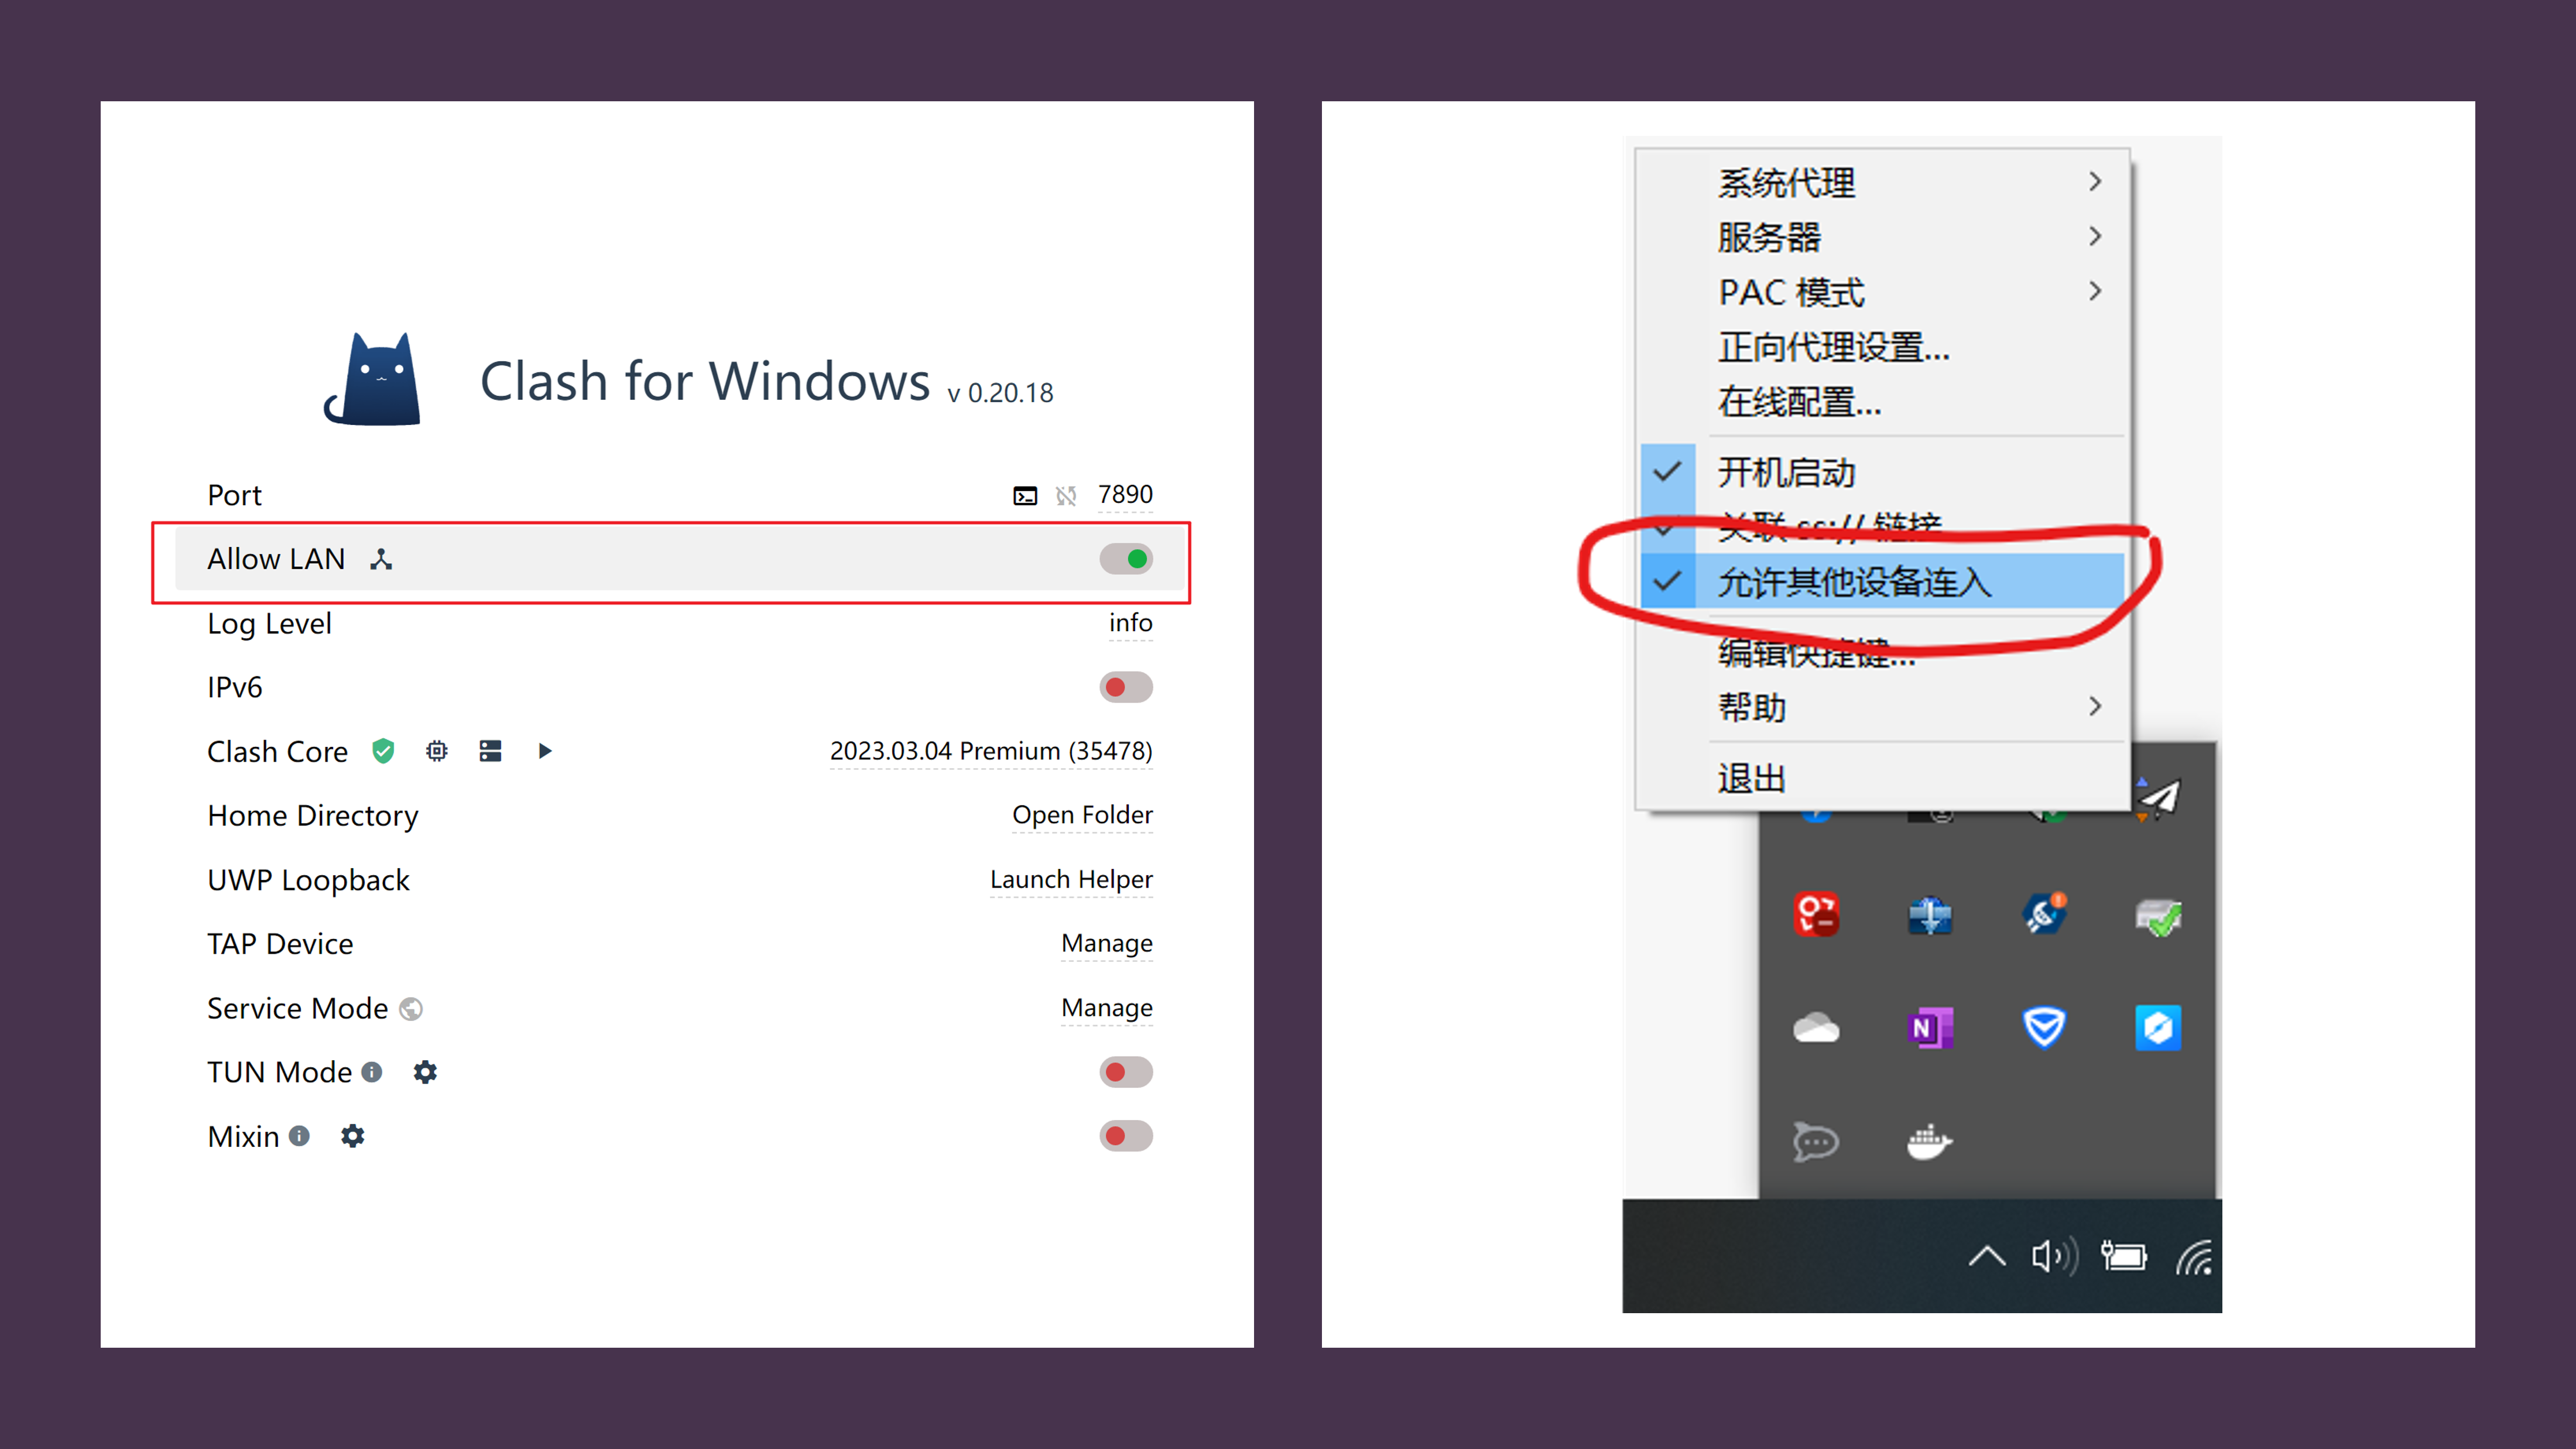
首先需要开启宿主机代理软件的 LAN 共享功能,以便 WSL2 可以访问到代理服务。基本主流的代理软件都支持这个功能,图中展示了 Clash for Windows 和 Shadowsocks(网图)的配置方法。
脚本
Linux 里配置代理虽然不复杂,但每次都要手动输入命令的话还是挺麻烦的。于是就写了一个脚本,方便随时启用与关闭。
随便找个位置新建一个文件,比如 proxy.sh ,然后把下面的内容复制进去,注意修改 port 为你的代理软件的端口号。
#!/bin/sh
hostip=$(cat /etc/resolv.conf | grep nameserver | awk '{ print $2 }')
wslip=$(hostname -I | awk '{print $1}')
port=7890

PROXY_HTTP="http://${hostip}:${port}"

set_proxy(){
    echo $PROXY_HTTP
    export http_proxy="${PROXY_HTTP}"
    export HTTP_PROXY="${PROXY_HTTP}"

    export https_proxy="${PROXY_HTTP}"
    export HTTPS_proxy="${PROXY_HTTP}"

    export ALL_PROXY="${PROXY_HTTP}"
    export all_proxy="${PROXY_HTTP}"

    # 给 apt-get 增加代理配置
    echo -e "Acquire::http::Proxy \"${PROXY_HTTP}\";" | sudo tee -a /etc/apt/apt.conf > /dev/null
    echo -e "Acquire::https::Proxy \"${PROXY_HTTP}\";" | sudo tee -a /etc/apt/apt.conf > /dev/null

    # 提示用户当前出口地址
    echo "Current ip (ifconfig.me):" $(curl -s ifconfig.me)
    echo "Current ip (myip.ipip.net):" $(curl -s myip.ipip.net)
}

unset_proxy(){
    unset http_proxy
    unset HTTP_PROXY
    unset https_proxy
    unset HTTPS_PROXY
    unset ALL_PROXY
    unset all_proxy

    # 清除 apt-get 代理设置
    sudo sed -i -e '/Acquire::http::Proxy/d' /etc/apt/apt.conf
    sudo sed -i -e '/Acquire::https::Proxy/d' /etc/apt/apt.conf

    # 提示用户当前出口地址
    echo "Current ip (ifconfig.me):" $(curl -s ifconfig.me)
    echo "Current ip (myip.ipip.net):" $(curl -s myip.ipip.net)
}

test_setting(){
    echo "Host ip:" ${hostip}
    echo "WSL ip:" ${wslip}
    echo "Generated proxy:" ${PROXY_HTTP}
    echo "proxychains config: socks5  ${hostip} ${port}"
    echo "Current ip (ifconfig.me):" $(curl -s ifconfig.me)
    echo "Current ip (myip.ipip.net):" $(curl -s myip.ipip.net)
}

if [ "$1" = "set" ]
then
    set_proxy

elif [ "$1" = "unset" ]
then
    unset_proxy

elif [ "$1" = "test" ]
then
    test_setting
else
    echo "Unsupported arguments."
    echo ""
    echo "Usage: proxy [set|unset|test]"
    echo ""
    echo "set: set proxy"
    echo "unset: unset proxy"
    echo "test: test proxy"
    echo ""
fi
然后给脚本增加可执行权限。
chmod +x proxy.sh
起个别名方便使用。编辑 ~/.bashrc ,在最后加上下面的内容。
alias proxy="source /home/j/sh/proxy.sh"
注意一定要加上 source ,否则脚本里的环境变量设置不会生效!
为什么 set 后,echo $http_proxy 为空? 当你在脚本中设置环境变量时,它们只在脚本的子进程中生效。这意味着在脚本执行期间,环境变量是设置的,但当脚本执行完成并返回到父进程(即你的终端会话)时,环境变量将不再生效。 为了让设置的环境变量在父进程(你的终端会话)中生效,你需要在当前环境中执行脚本,而不是创建一个新的子进程。要实现这一点,你可以使用 或 这样,脚本将在当前 shell 环境中执行,因此在脚本执行后,你应该可以在终端中看到 请注意,这仅适用于当前的终端会话。如果你打开一个新的终端窗口,环境变量将不再生效。要让环境变量在所有终端会话中生效,可以将它们添加到 shell 配置文件(例如 点击展开 ChatGPT 的解释
source 命令(或者在某些 shell 中使用点 .):source your_script.sh set
. your_script.sh set
$http_proxy 变量的值。~/.bashrc、~/.bash_profile 或 ~/.zshrc)中,然后在每次打开新的终端窗口时,这些设置都会自动加载。但是,请注意这可能不是你在这种特定情况下想要的,因为你的脚本允许临时设置和取消代理。
然后就可以愉快地使用 proxy 命令了。
proxy set
proxy unset
proxy test
效果
不支持环境变量代理的软件
有些软件不支持环境变量代理,可以使用 proxychains-ng 来解决。
下载软件:
wget https://github.com/rofl0r/proxychains-ng/releases/download/v4.16/proxychains-ng-4.16.tar.xz
## or, 如果 github 被不存在了,用 mirror
# wget https://gh.winterg.site/https://github.com/rofl0r/proxychains-ng/releases/download/v4.16/proxychains-ng-4.16.tar.xz
编译安装:
## needs a working C compiler, preferably gcc
# sudo apt install build-essential

tar -xvf proxychains-ng-4.16.tar.xz
cd proxychains-ng-4.16
./configure --prefix=/usr --sysconfdir=/etc
make
sudo make install # 可选,不安装需要通过路径使用
sudo make install-config # 可选 (installs proxychains.conf)
配置
proxychains.conf:proxy test # 复制 proxychains config 后面的内容,如 socks5 172.19.160.1 7890 # 粘贴到 conf 文件最后 vim /etc/proxychains.conf[ProxyList] # add proxy here ... # meanwile # defaults set to "tor" socks5 172.19.160.1 7890测试,命令前加上
proxychains4就行了:j@i:~/proxychains-ng-4.16$ proxy unset Current ip (ifconfig.me): 210.30.106.86 Current ip (myip.ipip.net): 当前 IP:210.30.106.86 来自于:中国 辽宁 大连 教育网 j@i:~/proxychains-ng-4.16$ curl google.com ^C (被不存在) j@i:~/proxychains-ng-4.16$ proxychains4 curl google.com [proxychains] config file found: /etc/proxychains.conf [proxychains] preloading /usr/lib/libproxychains4.so [proxychains] DLL init: proxychains-ng 4.16 [proxychains] Strict chain ... 172.19.160.1:7890 ... google.com:80 ... OK <HTML><HEAD><meta http-equiv="content-type" content="text/html;charset=utf-8"> <TITLE>301 Moved</TITLE></HEAD><BODY> <H1>301 Moved</H1> The document has moved <A HREF="http://www.google.com/">here</A>. </BODY></HTML> # -q 参数不打印奇奇怪怪的日志 j@i:~/proxychains-ng-4.16$ proxychains4 -q curl google.com <HTML><HEAD><meta http-equiv="content-type" content="text/html;charset=utf-8"> <TITLE>301 Moved</TITLE></HEAD><BODY> <H1>301 Moved</H1> The document has moved <A HREF="http://www.google.com/">here</A>. </BODY></HTML>